
你有没有想过,如何让你的应用程序直接与以太坊的魔力相连?想象你的应用可以轻松地与区块链互动,查询账户余额、发送交易,甚至与智能合约对话。这就是Web3的魔力所在!今天,我要带你深入探索如何使用Web3连接本地以太坊,让你的应用瞬间变得高大上。
一、Web3是什么?
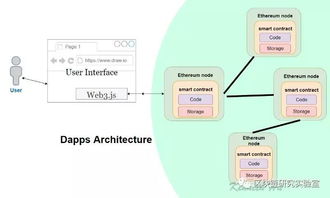
Web3,简单来说,就是下一代互联网。它建立在区块链技术之上,旨在实现去中心化的应用程序(DApps)的开发和使用。而以太坊,作为Web3的核心,是一个开放的区块链平台,允许开发者创建和运行智能合约。
二、连接本地以太坊的必要性
为什么我们要连接本地以太坊呢?原因很简单,本地节点可以让你更直接地与区块链互动,而不必依赖第三方服务。这样一来,你的应用将更加稳定、安全,且不受网络延迟的影响。
三、搭建本地以太坊节点
首先,你需要选择一个以太坊客户端软件。目前市面上有很多选择,比如Geth、Parity和OpenEthereum等。这里,我们以Geth为例。
1. 下载Geth:访问Geth的GitHub页面(https://github.com/ethereum/go-ethereum),下载最新版本的Geth。
2. 安装Geth:解压下载的文件,然后进入Geth的安装目录。在命令行中运行以下命令启动Geth:
```
geth --datadir /path/to/your/data/directory --networkid 15 --port 30303
```
这里的`--datadir`参数指定了数据存储的目录,`--networkid`参数用于指定网络ID,`--port`参数指定了节点监听的端口号。
3. 配置节点:在Geth的安装目录中,找到`genesis.json`文件,并对其进行编辑。你需要设置节点的IP地址和端口号,以及其他一些参数。
4. 同步区块链数据:启动Geth后,它会开始同步区块链数据。这个过程可能需要一段时间,具体时间取决于你的网络速度和计算资源。
四、使用Web3连接本地以太坊
现在,你已经有了本地以太坊节点,接下来就是使用Web3连接它。
1. 安装Web3.js:在项目中,使用npm安装Web3.js库:
```
npm install web3
```
2. 连接到本地节点:在JavaScript代码中,使用以下代码连接到本地以太坊节点:
```javascript
const Web3 = require('web3');
const web3 = new Web3(new Web3.providers.HttpProvider('http://localhost:30303'));
```
3. 查询账户余额:使用Web3的`eth.getBalance`方法查询账户余额:
```javascript
const accountAddress = '0x1234567890123456789012345678901234567890';
const balance = web3.eth.getBalance(accountAddress);
console.log(`Account balance: ${web3.utils.fromWei(balance, 'ether')} ETH`);
```
4. 发送交易:使用Web3的`eth.sendTransaction`方法发送交易:
```javascript
const accountAddress = '0x1234567890123456789012345678901234567890';
const targetAddress = '0xabcdefabcdefabcdefabcdefabcdefabcdefabcdef';
const value = web3.utils.toWei('1', 'ether');
const gas = 21000;
const gasPrice = web3.utils.toWei('50', 'gwei');
const nonce = await web3.eth.getTransactionCount(accountAddress);
const rawTransaction = {
from: accountAddress,
to: targetAddress,
value: value,
gas: gas,
gasPrice: gasPrice,
nonce: nonce
};
const signedTransaction = await web3.eth.accounts.signTransaction(rawTransaction, 'your_private_key');
const receipt = await web3.eth.sendSignedTransaction(signedTransaction.rawTransaction);
console.log(`Transaction hash: ${receipt.transactionHash}`);
```
5. 与智能合约交互:使用Web3的`eth.contract`方法与智能合约交互:
```javascript
const contractABI = [
{
constant: true,
inputs: [],
name: 'name',
outputs: [
{
name: '',
type: 'string'
}
],
payable: false,
stateMutability: 'view',
type: 'function'
},
{
constant: false,
inputs: [
{
name: '_spender',
type: 'address'
},
{
name: '_value',
type: 'uint256'
}
],
name: 'approve',